
Face ID is a handy feature that lets you unlock your iPhone, secure apps, make payments, confirm actions, and provide an added layer of security to your device. Even though Face ID is usually spot-on, there might be times when your iPhone doesn’t recognize your face anymore. In such cases, you may want to reset your Face ID—only to discover that Stolen Device Protection is blocking your way. Here’s how to turn off Stolen Device Protection without Face ID.
1. Turn Off Stolen Device Protection Using Your Passcode
When you first set up the Stolen Device Protection feature, you’ll be prompted to select either “Always” or “Away from Familiar Locations” under the Require Security Delay section.
If you selected “Away from Familiar Locations,” you can use a passcode to disable Stolen Device Protection. If you’ve chosen “Always,” proceed to the next section.
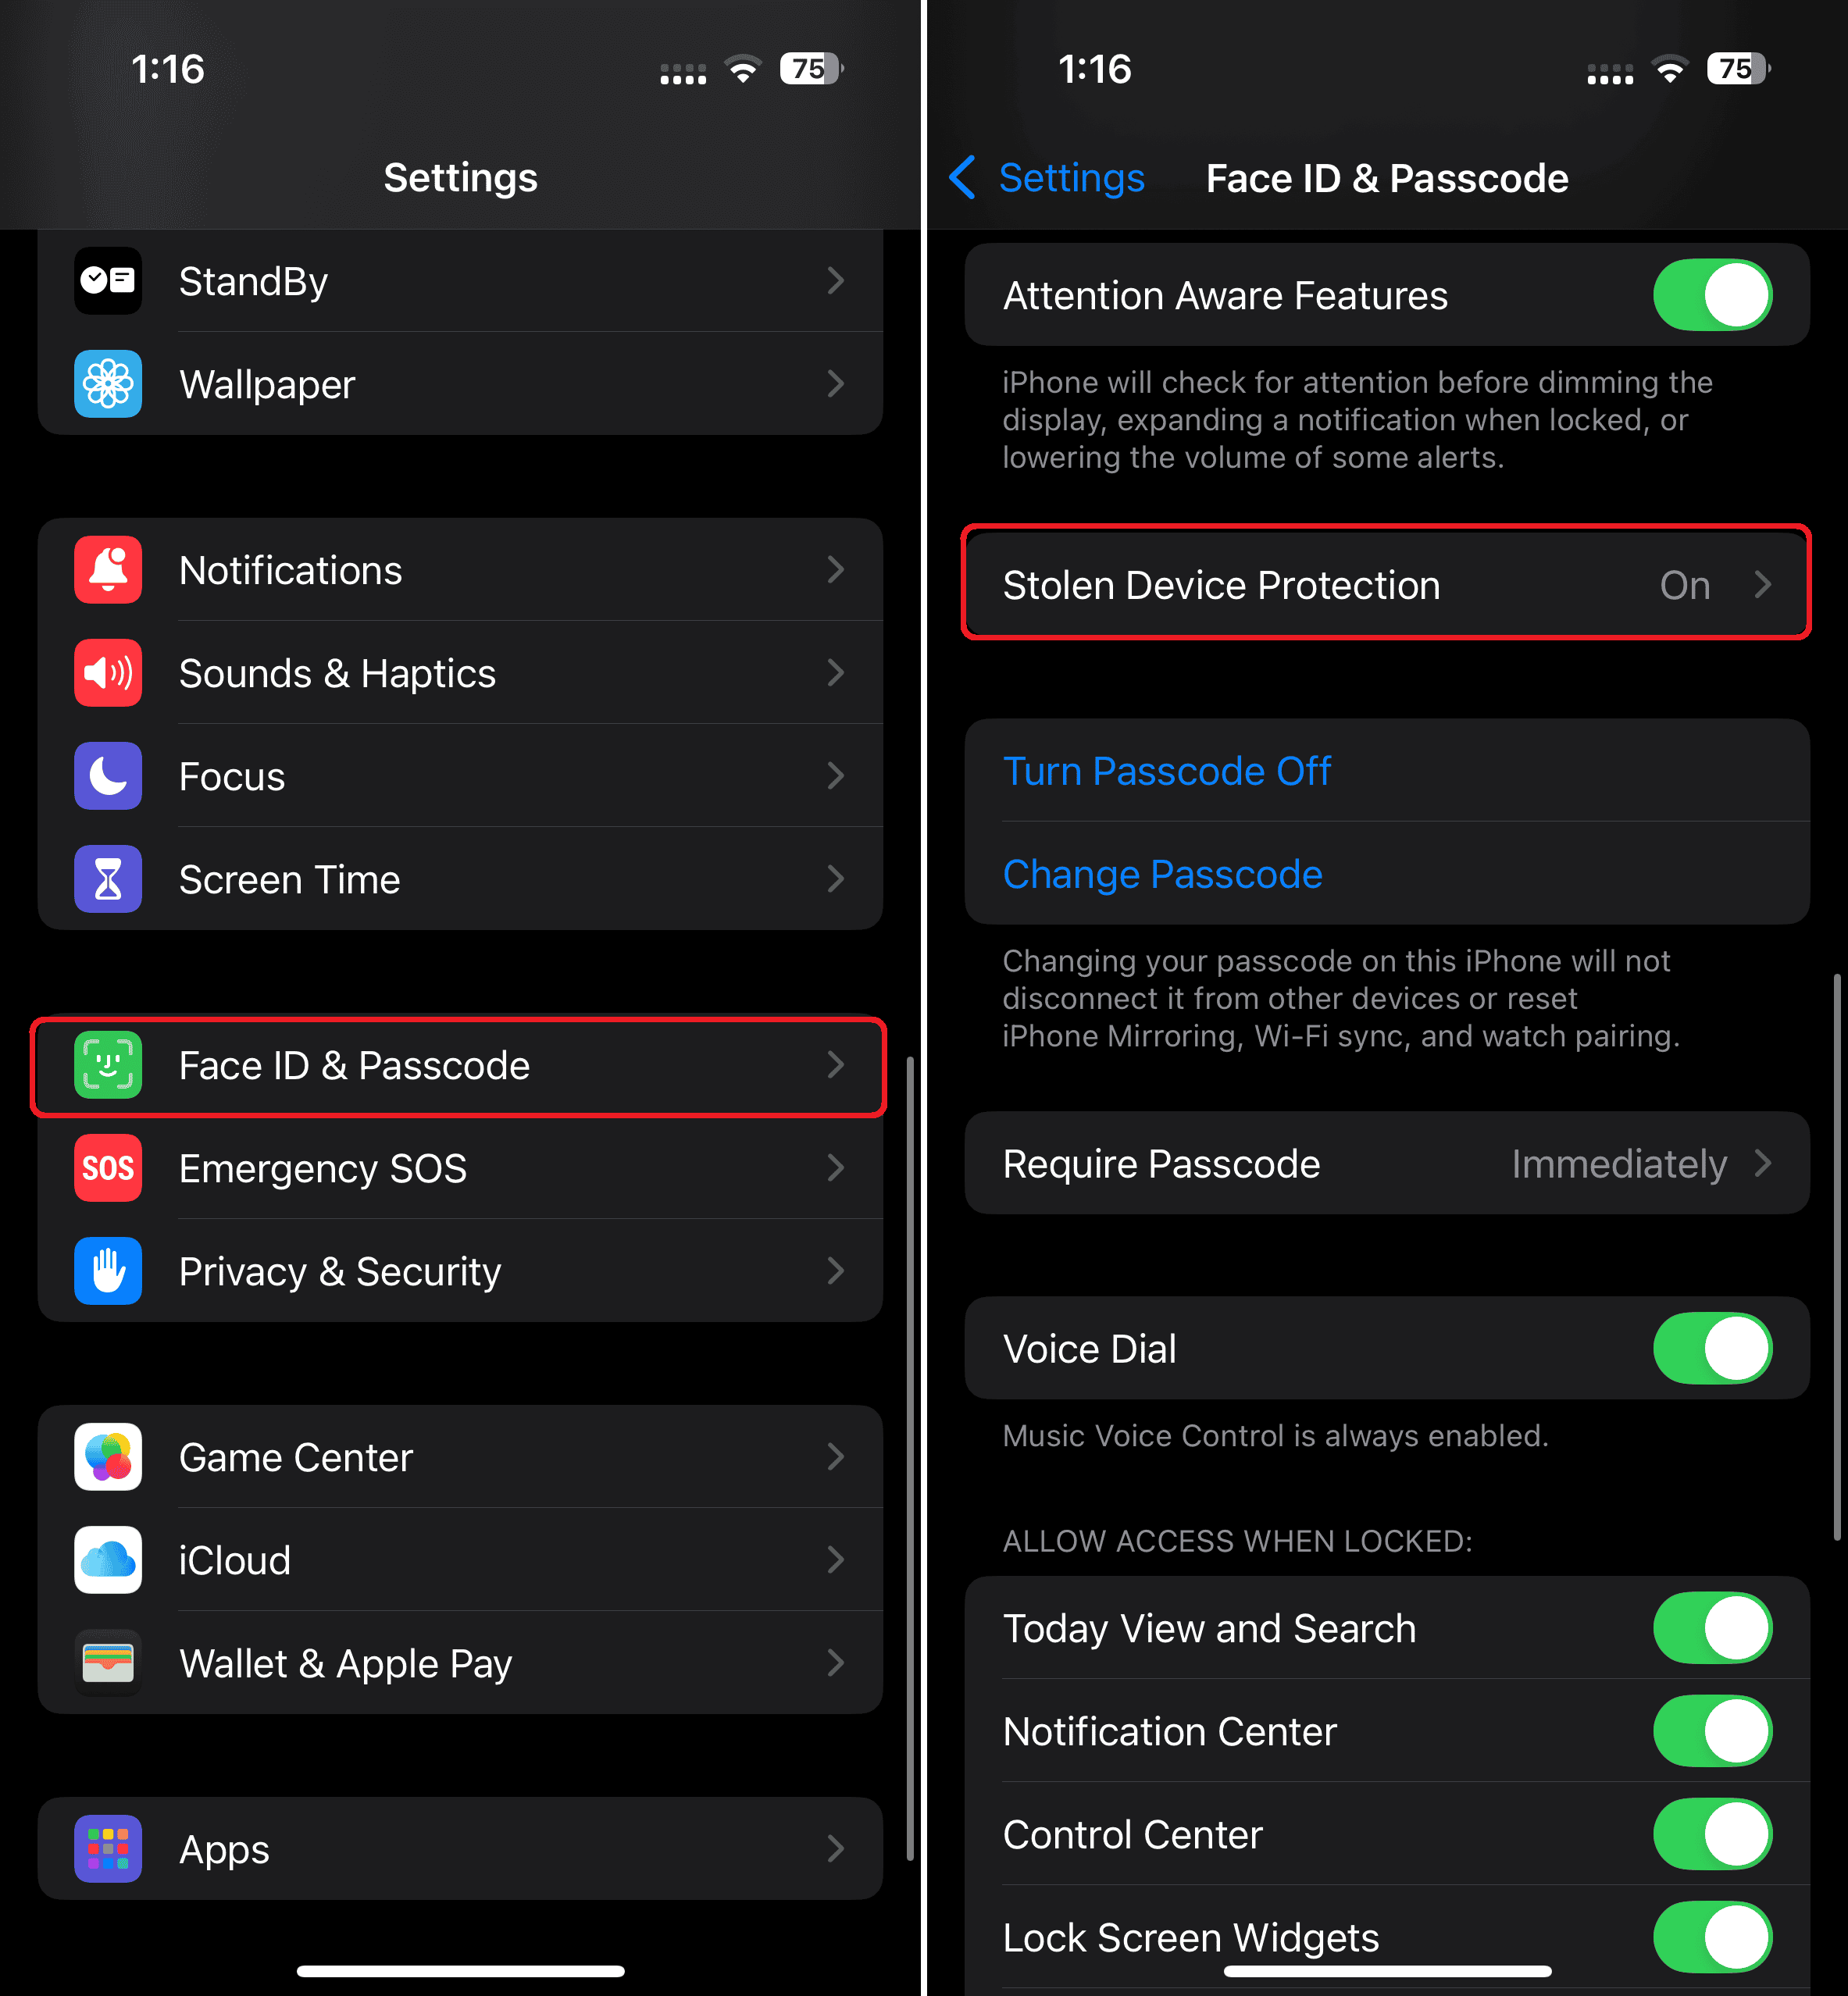
- On your iPhone, go to Settings > Face ID and Passcode.
- Tap Stolen Device Protection and check if “Away from Familiar Locations” is selected.

- If selected, try turning off the Stolen Device Protection toggle.
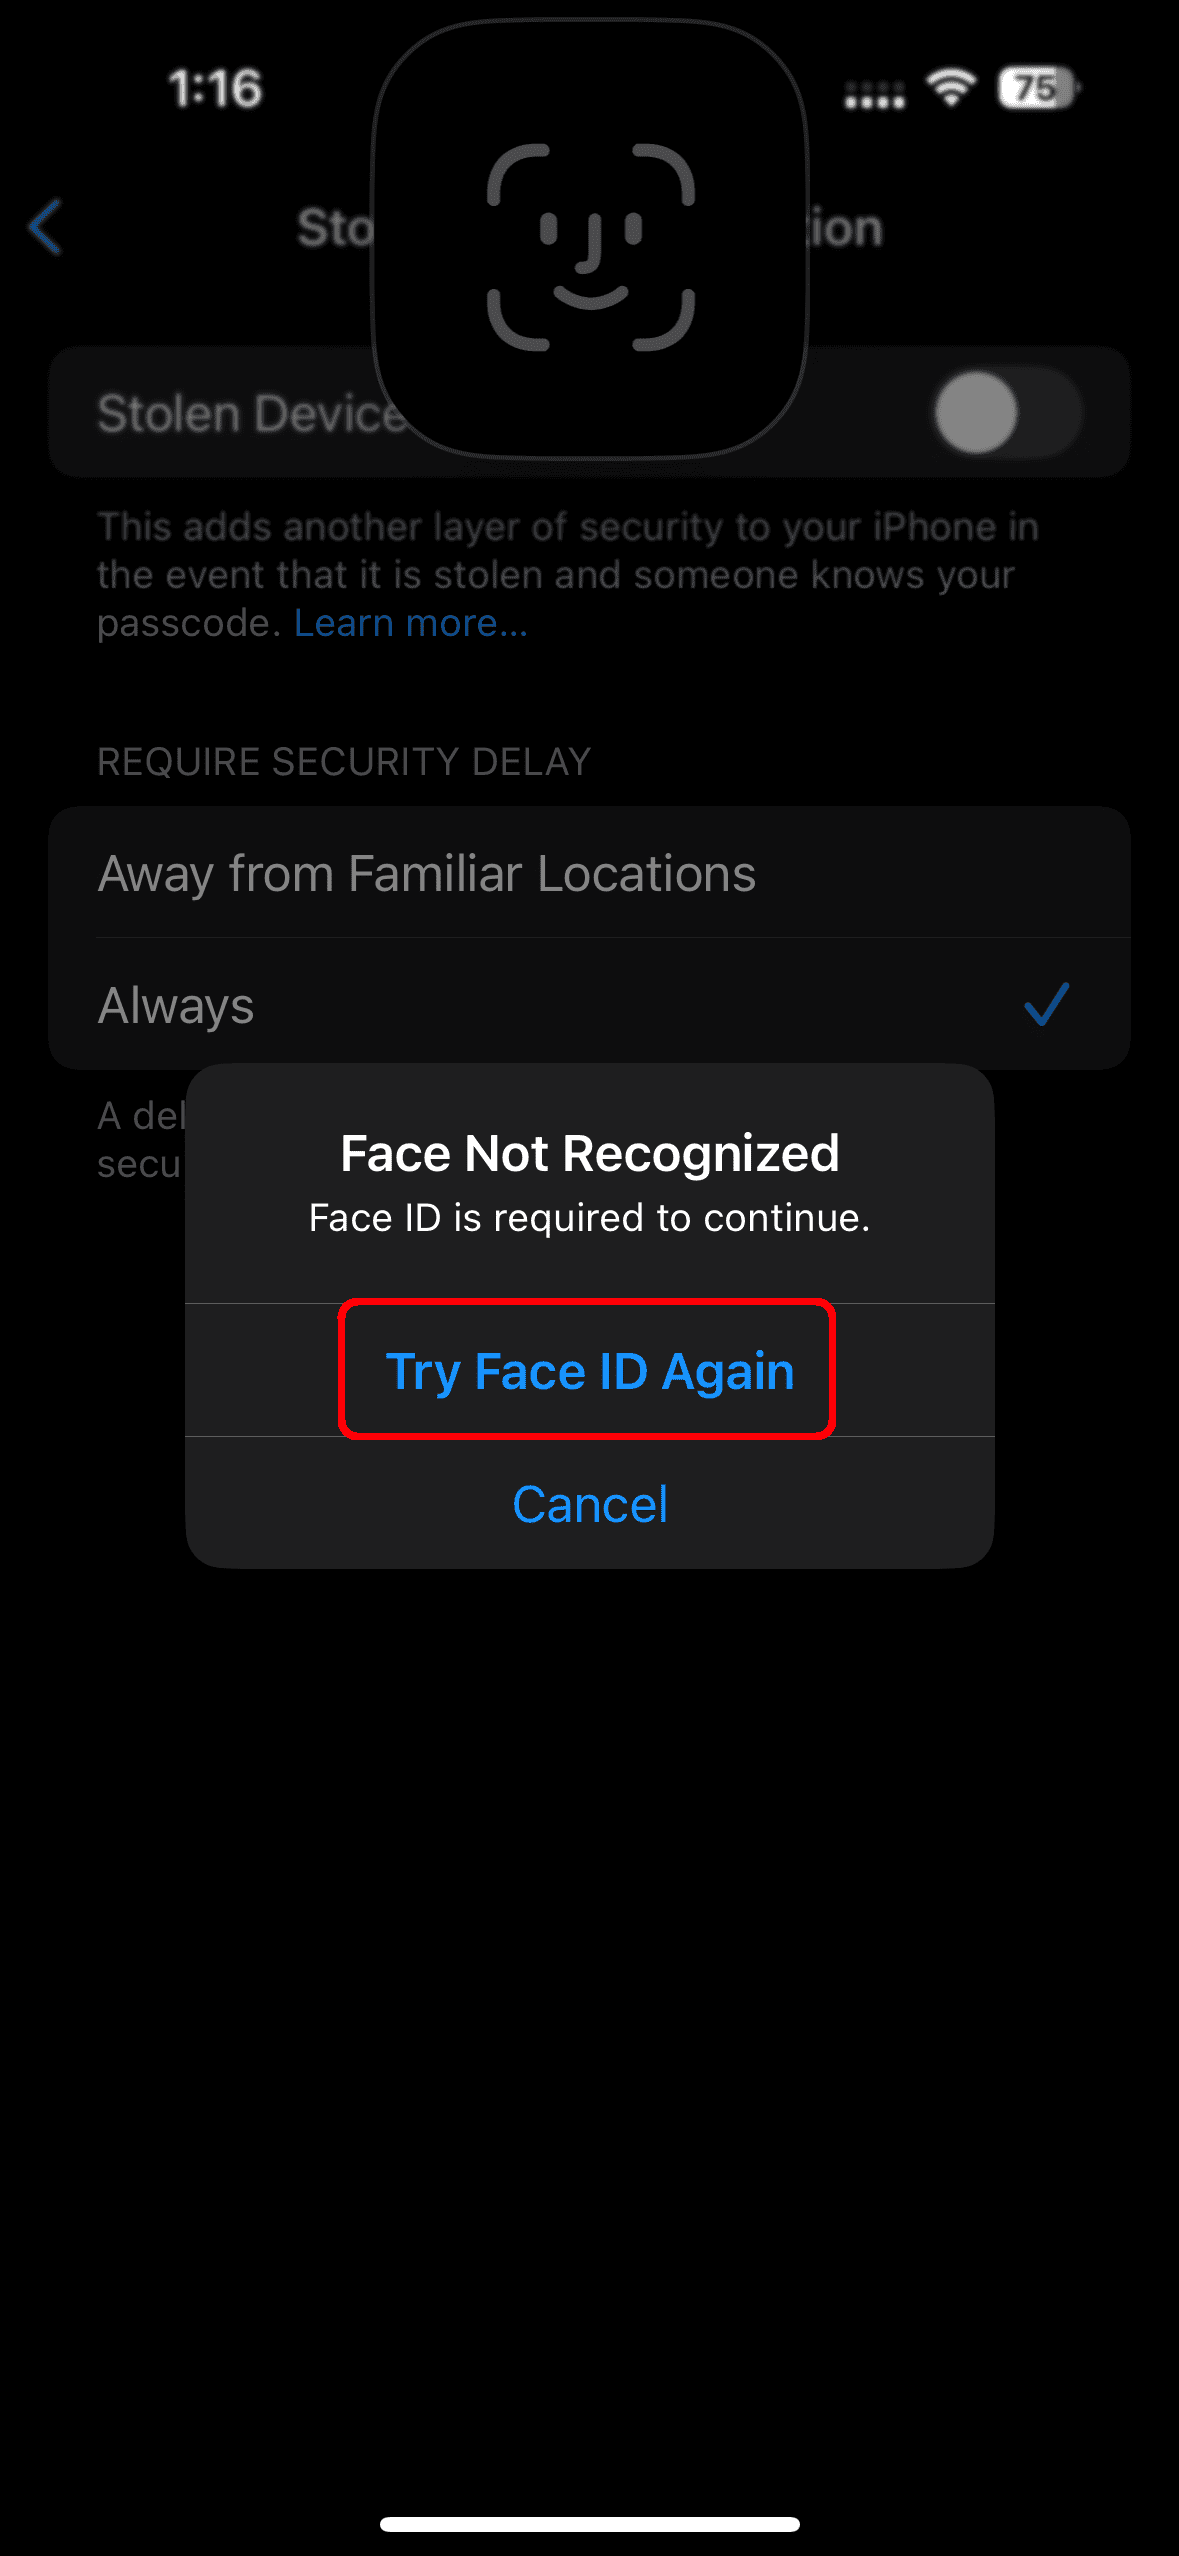
- Keep tapping the “Try Face ID Again” button until you see the Passcode option.

- Once you get the option, enter your passcode to turn the feature off.
2. Reset Your iPhone To Turn Off Stolen Device Protection
If the above method didn’t work or you’ve set the Require Security Delay option to “Always,” the only way to disable Stolen Device Protection without Face ID is to reset your iPhone. The process may seem complex, and you might be concerned about losing your important data, but as long as you follow the steps outlined below, there’s no need to worry.
2.1 Back Up Your iPhone
Since a reset will wipe out everything on your iPhone, we highly recommend creating a backup beforehand. Otherwise, you’ll lose all your saved contacts, photos, videos, documents, files, and other data.
You can use iCloud, a Mac, a Windows computer, or any storage service to back up your data. Once you’ve done that, you can restore data as needed.
For step-by-step instructions, you can visit our guide on how to back up your iPhone to iCloud, a Mac, or iTunes.
2.2 Erase All Content & Settings on iPhone
Now that you’ve successfully backed up important data, it’s time to reset your iPhone. Here’s how to do it:
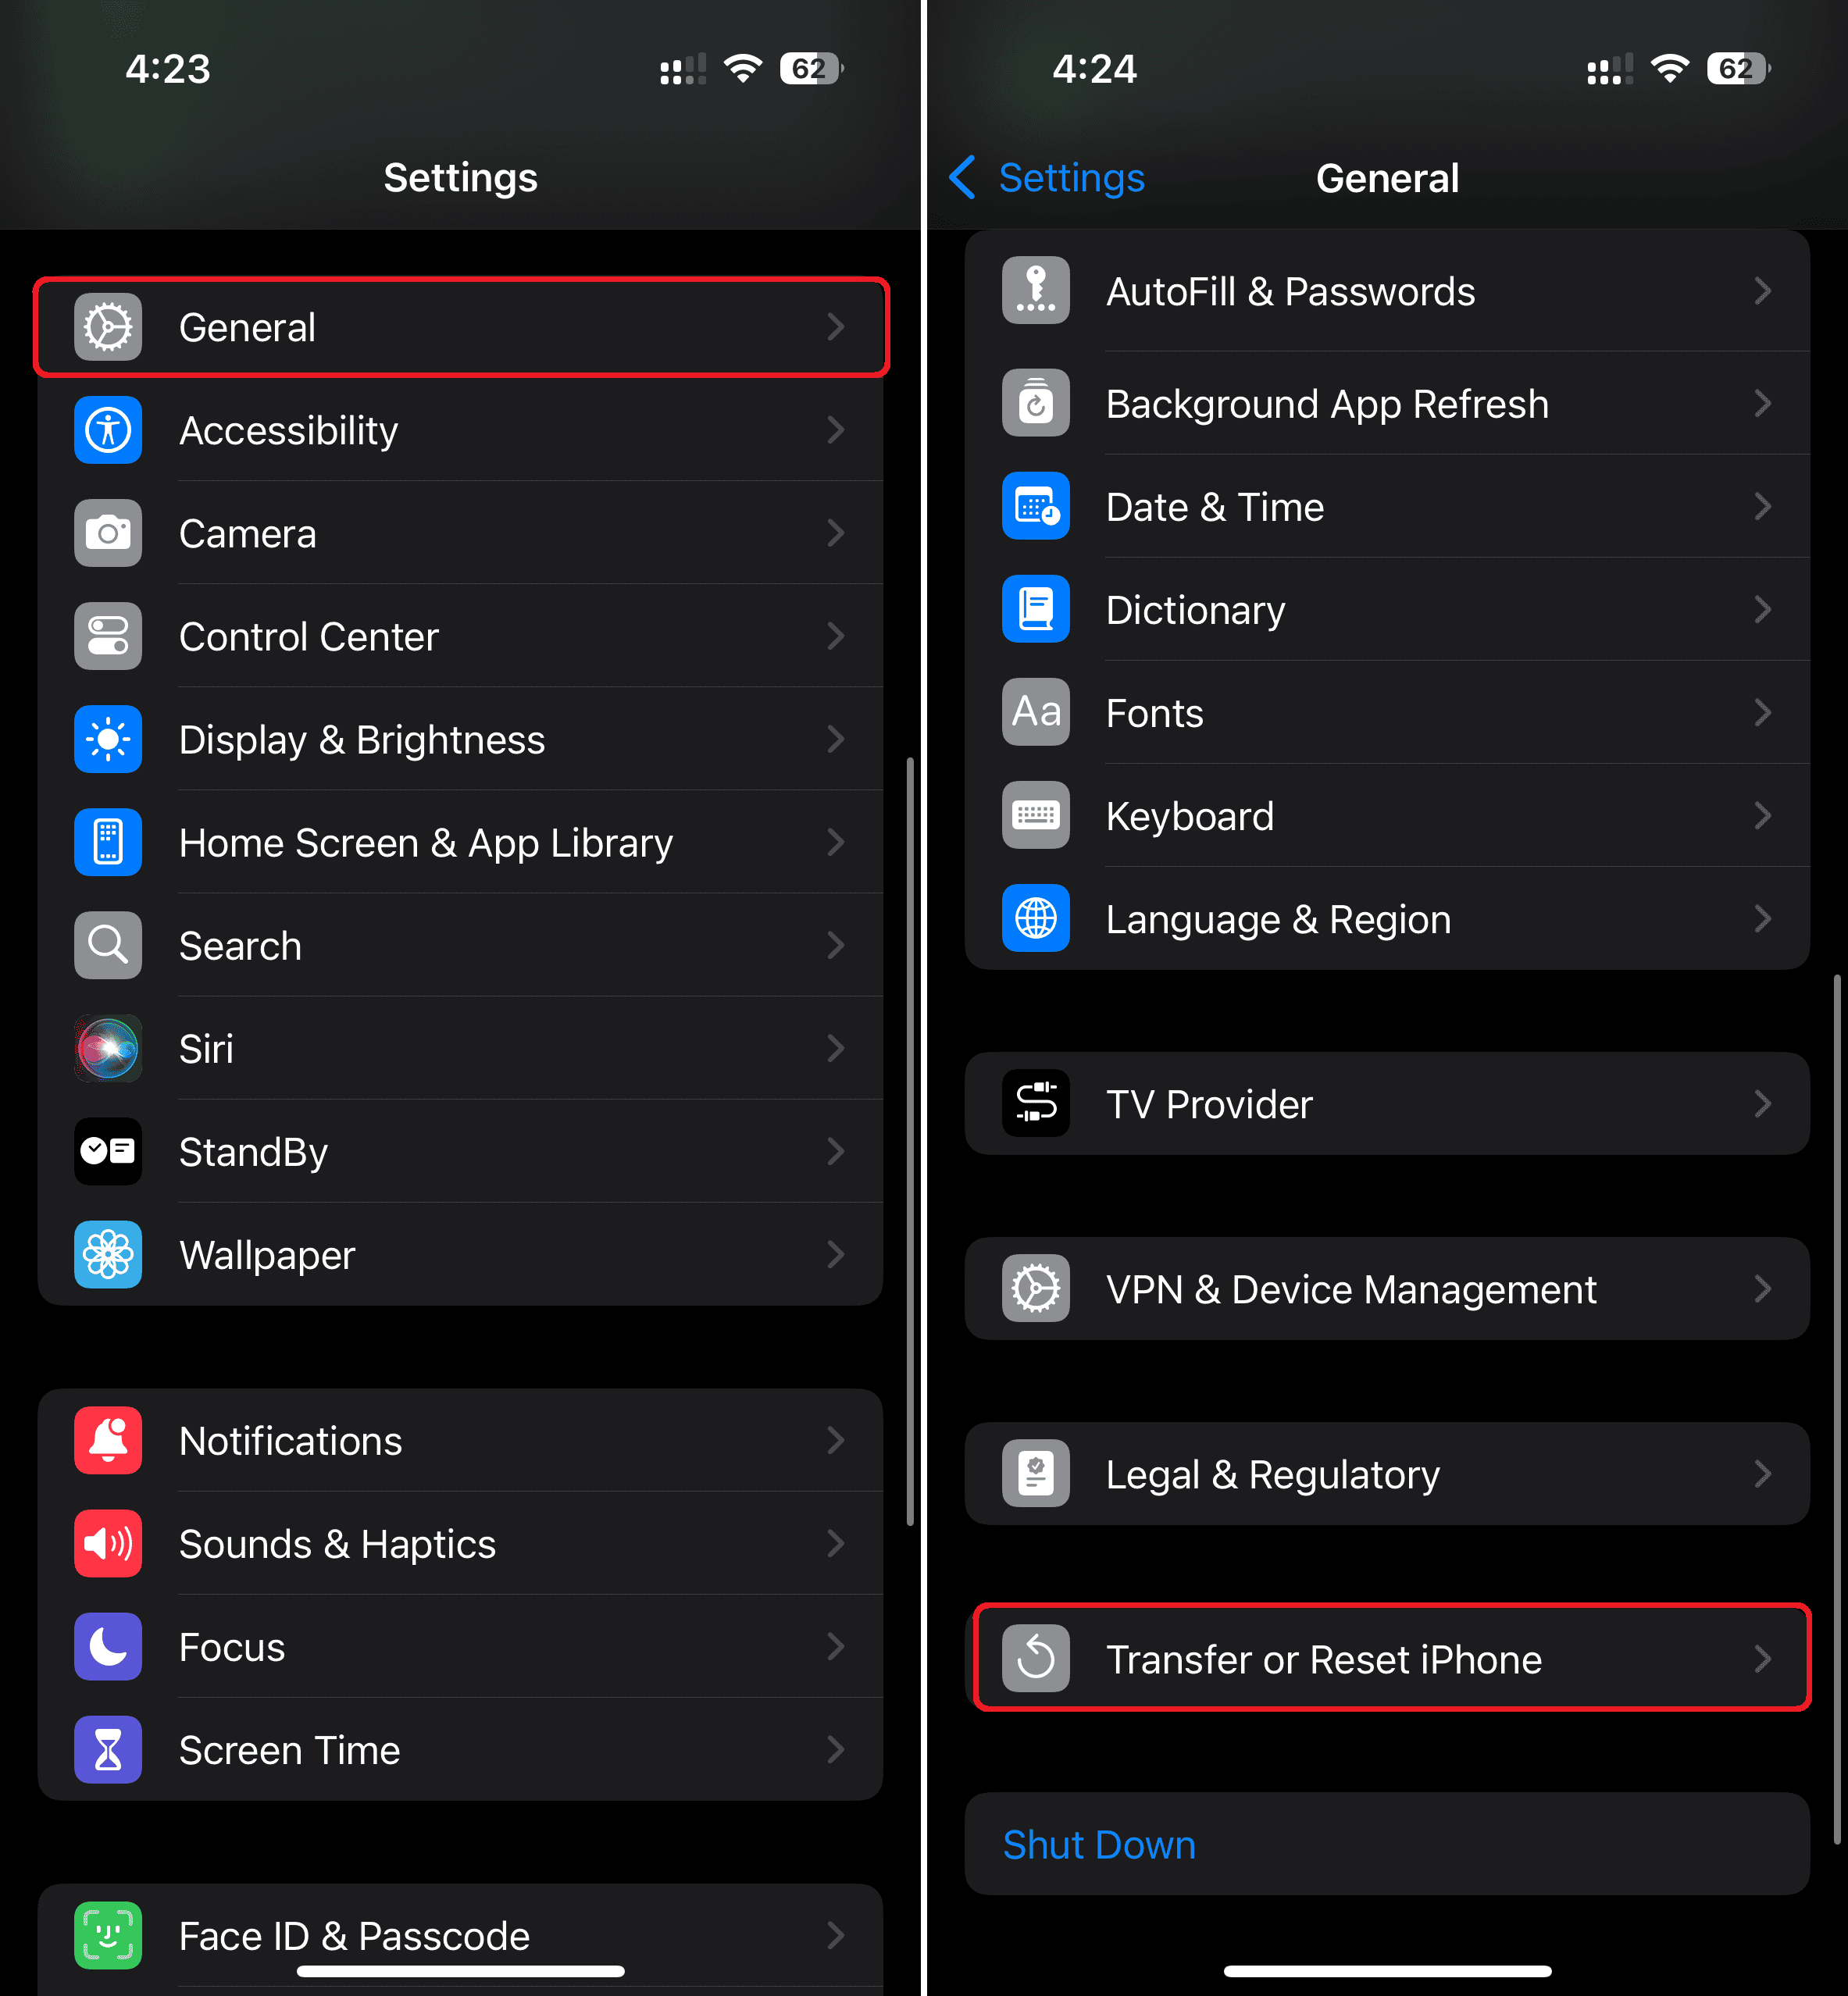
- Open Settings > General
- Scroll down to the bottom and tap Transfer or Reset iPhone.
- Tap Erase All Content and Settings.
- If prompted, enter your iPhone’s passcode or Apple Account password.
- Tap Continue to confirm your decision.

- If you’re using an eSIM, you can choose to keep or delete the SIM. If you choose the latter, you’ll have to contact your network provider to reactivate your cellular plan.

2.3 Reset iPhone Without Passcode
If you’ve forgotten your iPhone passcode, you can use your Apple Account and password to reset your iPhone without a computer. Here’s what you need to do:
- From your iPhone’s Lock Screen, enter the passcode several times until the “iPhone Unavailable” screen appears.
- Once you see that, tap Forgot Password from the bottom right.
- On the Security Lockout screen, tap the Start iPhone Reset button.
- When prompted, enter your Apple Account password to sign out on your device.
- Select “Erase iPhone” to permanently delete all saved settings and data.
- If you’re using an eSIM, you can choose to keep or delete eSIM and erase data.
- Your iPhone will restart automatically after the process finishes.

2.4 Set Up Your iPhone as New or Restore from the Backup
Once you’ve successfully reset your iPhone, you can set it up as new or restore it from a backup. When your phone restarts, follow the on-screen instructions to set up your iPhone and log in with your Apple ID.
3. Set Up a New Face ID
During or after setting up your iPhone, you can add a new Face ID using the below steps:
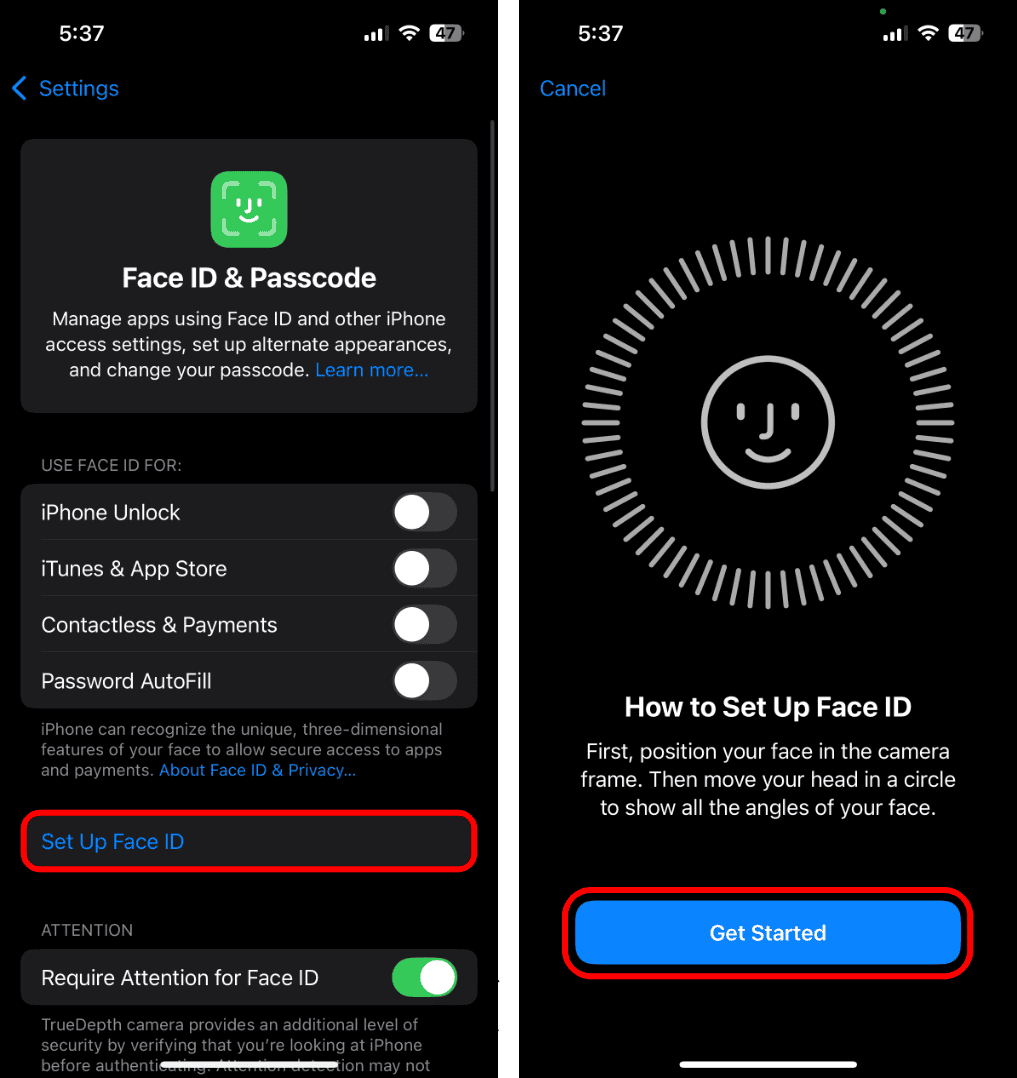
- Go to Settings > Face ID and Passcode.
- Here, select the Set Up Face ID option.
- Tap Get Started and follow the on-screen instructions.
With this new Face ID, you can disable or enable Stolen Device Protection on iOS.
If Face ID isn’t working on your iPhone after the iOS 18 update, here are five quick fixes to solve this issue.